Tutorial: Create and Execute your first testcase
This tutorial shows you the concept of BiG EVAL and basic features used to build a first test case. They are the foundation for each test case you will build in the future. At the end of this tutorial you get a simple test case, that compares actual record counts between two databases.
Requirements
To follow this tutorial successfully we recommend you to have a Microsoft SQL Server ready with an installed Adventure Works Sample Database. How to install Adventure Works Sample Databases.
You can use another database as well, but in this case you need other SQL queries then we do in this tutorial.
Please ensure that the service account of BiG EVAL has read-permissions on the Adventure Works database.
Overview
The following steps must be performed during this tutorial:
- Setup Datasource
- Create Testcase
- Execute Testcase
Setup Datasource
We use the ERP database of the sample company Adveture Works in this tutorial. To enable BiG EVAL to access this database you need to create and setup a datasource. This datasource can be used in as many testcases as you want afterwards.
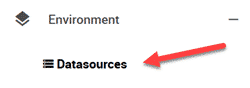
- Click on “Environment” and “Datasources” in the main menu.
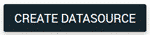
- Click on “Create Datasource”.
- Enter “AW ERP” as the name and select “OLE DB” as the type of the datasource.
- Change to the tab “Connection” and enter the following connectionstring. Replace SERVER and DATBASE by the respective hostname of your Microsoft SQL Server and the name of the Adventure Works database.
Provider=SQLNCLI11;Server=SERVER;Database=DATABASE; Trusted_Connection=yes;Example:Provider=SQLNCLI11;Server=localhost;Database=AdventureWorks2014; Trusted_Connection=yes;
- Ensure that the dialect is set to “Microsoft SQL Server (T-SQL)”.
- Click on “Create Datasource” to save the settings.
Create Testcase
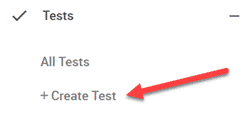
- Click on “Tests” and “+ Create Test” in the main menu.
- Enter the name “My first test” and click on “Create Test”. The Test-Editor gets opend.
- Ensure that the testmethod “Probes exactly equal” is set.

- Switch to the tab “Probes”.
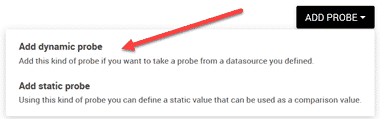
- Click on “Add Probe” and “Add dynamic probe”. The configuration interface of the new probe gets opened.
- Select the datasourcde we created before.
- Enter the following SQL-Query into the Query-box.
SELECT count(*)
FROM [HumanResources].[Employee]
- Ensure that the extraction “Value of the first cell” is selected.

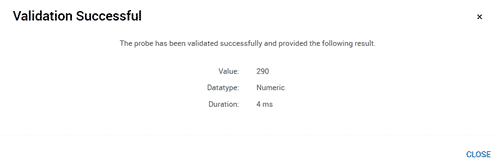
- Click on the button “Validate” to execute the SQL-Query. There should be a success-message when the execution finishes. If there is an error message it usually means that you don’t have access to the database. Otherwise you see a respective error message.
- Repeat steps 5 to 9 to add a second probe.
For simplicity reasons we add two identic probes to the testcase during this tutorial. Normally you add two or more different probes.
Execute Testcase
As soon as you have at least two probes added to the testcase, you are able to execute it. Following we start the testcase manually. There are more possibilities to automate testcase execution, but we do not look at this possibilities within this tutorial.
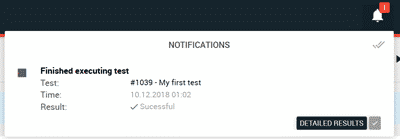
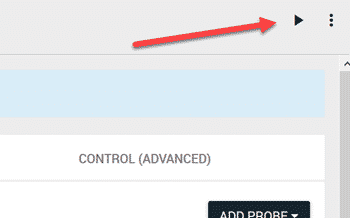
- Click on the Play-button in the top right corner of the Testcase-Editor to start the test manually. Shortly you see a notification in the messagecenter that tells you that the testcase is currently executing.
- As soon as the testcase finishes, you get another notification that allows you to access detailed testresults using the button “Detailed Results”.